To solve a paper-folding problem, undo the last fold first and mirror every existing hole across that crease. Keep each reflected hole the same distance from the crease. Repeat until the sheet is open. Counting holes can help you check, but their positions decide the answer.
That rule is easier to understand with a picture than a paragraph. The examples below show exactly what changes at each unfold. They use an eight-by-eight grid so an adult and child can describe the same location without pointing at different dots.
Download the free paper-folding practice pack (PDF, 4 pages) — one worked example, six practice problems, blank answer grids, and a complete visual answer key. No signup is needed.
These are original GrowMindGrow learning exercises, not official CogAT questions or a score predictor. The grid is our teaching aid. After the lesson, choose a focused Paper Folding session, check the grade and level, then press Start. You can also choose all three areas in the free CogAT practice test.
For another picture puzzle, explore Figure Matrices or Figure Classification, each with six original examples and a free printable pack.
What does CogAT paper folding ask a child to do?
Paper Folding is part of the CogAT Nonverbal Battery. A child follows a pictured sequence of folding and cutting or punching, then identifies the opened sheet. Riverside’s official test descriptions describe the task across levels, with the form of the problem changing as the level changes.
The useful skill is spatial reasoning: keeping track of where parts of a sheet move. It is not an origami vocabulary test. A child may understand the explanation once you physically open a sheet but still need practice imagining the same movement.
Ask the school which form and level it uses. Our exercises teach a reflection strategy; they do not reproduce a particular administration. The CogAT parent guide explains levels, score reports, and the questions worth asking before test day.
The four-step paper-folding strategy
- Follow the folds in order. Find the part of the original square that remains visible after folding.
- Locate every hole. Notice its distance from each crease, not just whether it is near a corner.
- Open the most recent fold. Keep the existing holes and add their reflections on the other side of that crease.
- Open the next fold. Reflect the whole set now visible, including the copies you just created.
Reflection is a mirror movement, not a turn. A hole two squares to the right of a vertical crease appears two squares to its left. Its height does not change. Opening a horizontal crease changes the row while leaving the column alone.
In our examples, columns run A–H from left to right and rows run 1–8 from top to bottom. A dark dot is a hole. The tinted area is the folded paper; the pale area shows where the original square used to extend.
Example 1: one fold, one matching hole
Fold the left half onto the right half. Punch a hole at G3: column G, row 3.
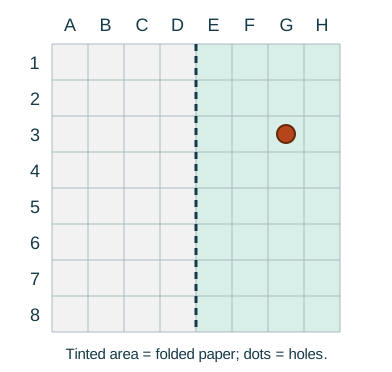
There is only one crease to open. G is the third column on its side of the middle crease. Count the same distance on the other side and you reach B. The row stays 3.
Open the fold: see the answer
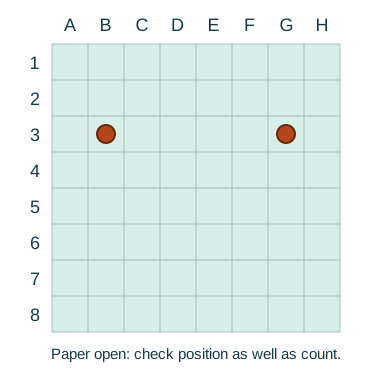
The answer is B3 and G3. A dot at B6 would have moved vertically too. A dot at C3 would be too close to the crease. Both are useful mistakes to discuss because they reveal which part of reflection needs another look.
Example 2: two folds, opened in reverse
Fold left over right, then top over bottom. The visible paper is now the bottom-right quarter. Punch G6.
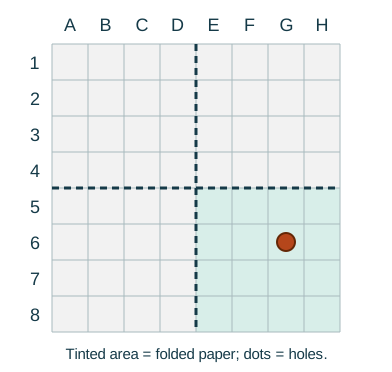
First open the horizontal fold, because it was made last. G6 reflects to G3. The sheet is still folded vertically, so the left half has not appeared yet.
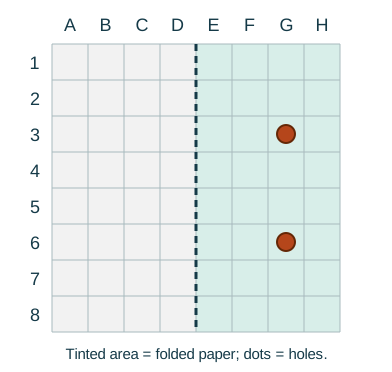
Now open the vertical fold. Both visible holes need partners on the left: G3 reflects to B3, and G6 reflects to B6.
See all four final holes
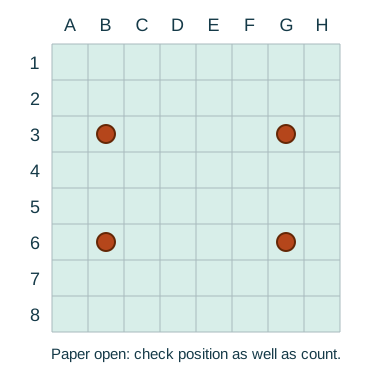
The answer is B3, G3, B6, and G6. A choice showing four holes only along one row has the right count and the wrong arrangement.
Example 3: a third fold changes which crease opens first
Begin with the same two folds: left over right, then top over bottom. Fold columns E–F onto G–H. Punch H7 in the narrow strip that remains.
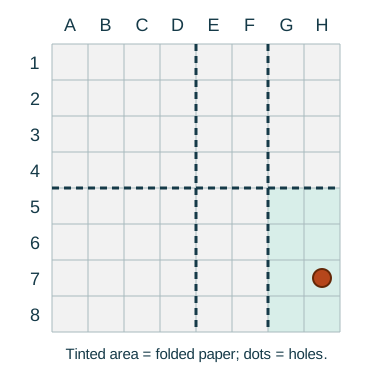
Open that small fold first. It creates E7 and H7, not a mirror across the middle of the full sheet. The active crease is between F and G.
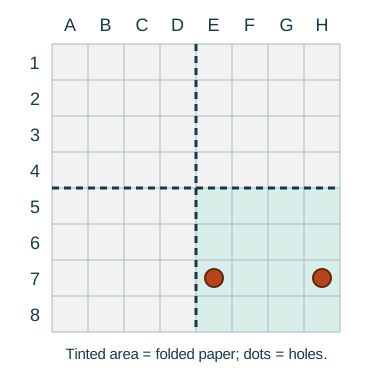
Next, open the horizontal middle crease. The holes now occupy E2, H2, E7, and H7.
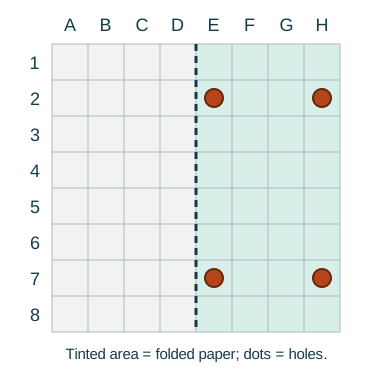
Open the original vertical fold and check the final answer
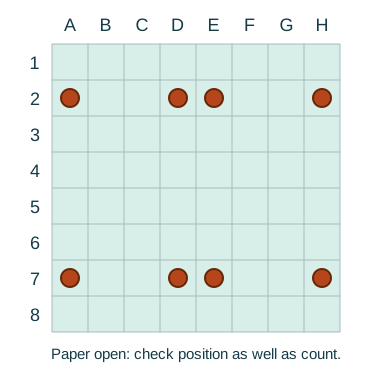
The final answer is A2, D2, E2, H2, A7, D7, E7, and H7. Opening one crease at a time keeps the intermediate picture manageable.
Six paper-folding practice questions
Use the printable pack for the folded pictures and blank grids. It includes the three worked examples above so children can revisit them, plus three variations. Try each before opening its answer below.
| Problem | Fold sequence | Punch location |
|---|---|---|
| 1 | Left half onto right half | G3 |
| 2 | Top half onto bottom half | C6 |
| 3 | Left onto right; top onto bottom | G6 |
| 4 | Top onto bottom; left onto right | E7 |
| 5 | Left onto right; top onto bottom | F5 and G7 |
| 6 | Left onto right; top onto bottom; E–F onto G–H | H7 |
Check all six answers and the reasoning behind them
- B3, G3. Open the vertical middle crease; the row stays fixed.
- C3, C6. Open the horizontal middle crease; the column stays fixed.
- B3, G3, B6, G6. Open horizontal, then vertical. Mirror both holes at the second step.
- D2, E2, D7, E7. Open vertical, then horizontal. These holes sit close to the vertical middle crease.
- B2, G2, C4, F4, C5, F5, B7, G7. Track the two original punches separately, then combine the results. Each produces four holes.
- A2, D2, E2, H2, A7, D7, E7, H7. Open the crease between F and G, then horizontal middle, then vertical middle.
The PDF’s last page draws every answer. If the coordinate list is distracting, use the pictures and describe the mirror movement aloud.
Common mistakes and a useful next question
Opening the wrong crease first: Ask, “Which fold did we make last?” Rebuild the folded state rather than trying to repair the final answer from memory.
Keeping only the new copy: The old hole stays. Ask the child to point to the original hole before adding its reflection.
Mirroring only one hole: Cover the next fold temporarily. Account for each visible hole before opening another crease.
Turning instead of reflecting: Trace a short line from a hole to its crease, then extend the same distance straight across. A mirror point does not swing around a corner.
Counting without placing: Two answers may have four holes. Ask which holes must share a row or column and which must be the same distance from the crease.
Our six exercises use interior punches passing through every layer, away from crease edges. They therefore produce two, four, or eight distinct holes. Do not turn that pattern into a universal rule for every cutting problem: edge cuts, coinciding positions, and different folded shapes require attention to the actual diagram.
Keep practice short and useful
Start with one fold even if the child’s test level is higher. Move to two when the child can explain the reflection on a fresh example. If the explanation disappears when another fold is added, return to the last step that made sense.
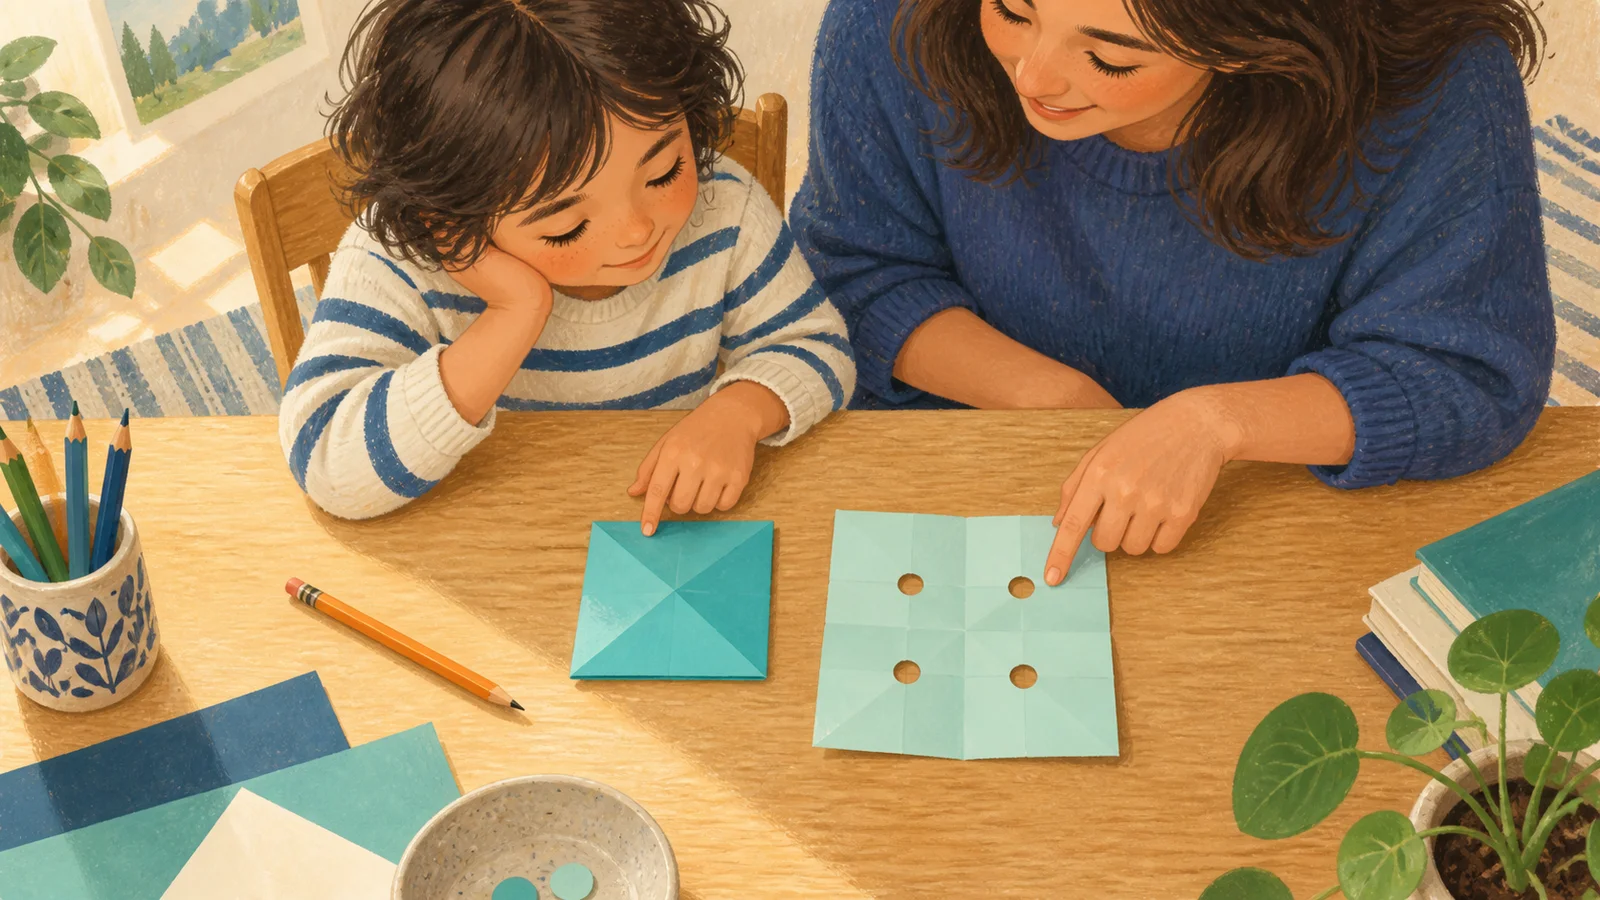
An adult can demonstrate with real paper and make the holes while the child predicts. Keep the sheet’s orientation fixed. The purpose is to understand a movement, not to collect a practice score or race a sibling.
Once the strategy feels familiar, try a mixed session in the CogAT practice tool. If frustration takes over, the learning challenge planner can help turn “I’m bad at this” into one specific next step.
CogAT is a registered trademark of Riverside Insights. GrowMindGrow is not affiliated with or endorsed by Riverside Insights. These original resources teach reasoning and familiarity; they do not guarantee any test result or program placement.